How Can I Manage Tasks for My Jobs or Projects?
Overview
Every business has jobs or projects they need to complete for their customers. In many cases, these can be divided up into separate tasks and these need to be tracked and monitored to ensure everything stays on track. Effective management of these tasks leads to happy customers and is essential for a healthy prosperous business.
In this blog, we are going to look at how we can use Core to effectively manage these tasks and hold the right people accountable for their completion. Before we do that, here is a quick video discussion that desribes the benefits to your business.
Goals
- Create a list of Tasks for each Project
- Set Start and End Dates
- Assign Tasks to Team Members
- Collaborate on Tasks with other Team Members
- Track the current Status of each Task
- Create Personalised “To Do” lists for each Team Member
- Create a Management Dashboard to highlight Tasks that need attention
- Create email alerts to prompt immediate action
Prerequisites
We are going to build on some of the features we developed in previous blog posts. See for example: How Can I Manage the Customer Relations in My Business?
In this case, we are going to assume you already have Content Types for:
- Organisations
- People
If not, you can easily create those in about 10 mins.
Step 1 – Create the Project Content Type (5 Mins)
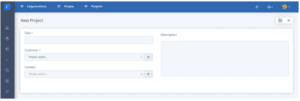
For this example, we will be creating a Content Type called “Projects”. In your business you might call them Jobs, Events, etc. We will make a simple set of fields, but you could easily extend this as required:
- Title
- Customer (Links to Organisations)
- Contact (Links to People)
- Description (Text Box)
To keep things simple, we are only going to track start/end dates, status, etc on the individual Tasks. But we could also do this on the overall Project if desired.
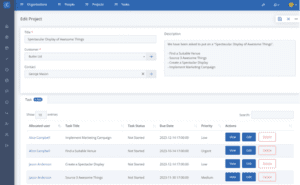
This is what it looks like:
Step 2 – Automatically Filter the Contact List (2 Mins)
A nice feature of Core is the ability to automatically filter drop-down lists. In this case, we have set the “Contact” field to automatically filter to Contacts for the selected “Customer”.
Step 3 – Enable Tasks & Comments (2 Mins)
Both Tasks and Comments are such useful features, we have built them into Core as standard. You do not need to create these, you can simply enable them on any Content Type you wish.
Step 3 – Create a Project and Add Some Tasks (5 Mins)
The time for this depends entirely on the nature and complexity of your projects. But the project in this example took just a few minutes to set up:
Step 3 – Collaborate on Your Project (As long as you like)
One major benefit of using Core for managing your Tasks is the way it allows you to easily collaborate on projects:
- Assign and re-assign tasks
- Set and update target dates and statuses
- Track conversations (via comments)
- Notify others of updates
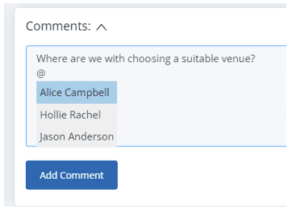
Notifying other Team Members of updates is easy and intuitive with the “User Mentions” feature. When adding a Comment simply type “@” and start typing the person’s name, you will see a list of users to select from:
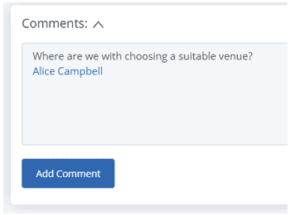
Choose the person you want to notify, and it will automatically turn into a notification link:
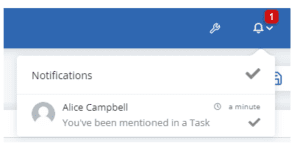
Once you “Add Comment” the user will be notified. Each user can choose how they want to receive notifications: Email, Alert Box or both. The alert box is shown below:
Step 4 – Create Dashboards for Big Picture Overview (10 Mins)
An essential part of holding people accountable is the ability to easily create Dashboards. In this case, we want to show personalised “To Do” lists for individual Team Members, and a separate dashboard for the manager to show all overdue Tasks.
Creating a Dashboard is a two-step process:
- Create a “Content Query” to select the data you want to display
- Add a “Dashboard Tile” to a new or existing Dashboard
Content Query for Individual Team Members
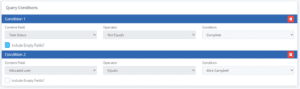
This is a simple query with two conditions, and it should include Tasks where both the conditions are met:
- Task Status is not “Complete” including ones where the status is not set
- Task is allocated to the specific Team Member
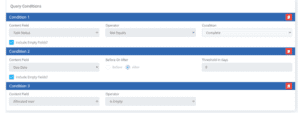
Content Query for Managers Dashboard
This one has three conditions, and it should include Tasks where any of the conditions are met:
- Task Status is not “Complete” including ones where the status is not set
- Due date is before “Today” including ones where the due date is not set
- Task is not allocated to any Team Member
For more about creating Content Queries, see our Documenation and/or Video Tutorial.
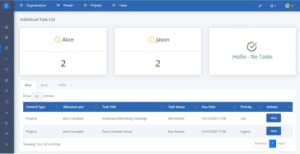
Add the Queries to the relevant Dashboards
In this case, we have added three tabs to the same dashboard, but we could just as easily create three separate dashboards:
We could go a lot further with this, such as creating separate tiles for overdue, nearly due, etc. with different criteria for each.
In a later blog post, we will look at how to use “Calculated Fields” to create a “Project at Risk” dashboard that lists projects where the individual Tasks meet specific criteria that might put the whole Project at risk.
Set the Relevant Dashboards as the Home Page for Each User
This step is optional, but you can easily set the homepage for each user to be one of your newly created Dashboards. That way, the user will automatically be directed to the relevant Dashboard when they log in.
Step 5 – Set Up Actionable Alerts
The final step to achieving our goals for this project will be to set up our “Actionable Alerts”. These are automated notifications that prompt Team Members when something requires immediate attention.
Like what we did for Dashboards, this is also a two-step process:
- Choose a “Content Query” to select the data you want to alert about
- Create an Actionable Alert to notify the relevant person or people.
The example below shows how to set up an alert to email Alice, every day at 9am, with a full list of all her open tasks:
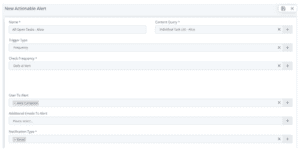
This example simply recreates the list Alice sees on her dashboard, but there is much more we could do if we made different queries or selected different “Trigger Types”. Some examples would include:
- Weekly email to each Team Member of all tasks coming due in the next seven days
- Daily email to the Team Manager of all overdue tasks
- Immediate email to the assigned Team Member when a Task is created or updated
Just like User Mentions, Actionable Alerts can also notify through different channels:
- Alert Box
- Teams (More about this in a later blog)
The options in this area are endless if you let your imagination run free. We hope you have fun planning and implementing your exciting projects. If you need to any help or would like to speak with a member if our team we are happy to help! Please click here.