For this post we are going to look at another common business scenario.
Suppose we have a nice shiny website with a customer enquiry form, and when someone fills out the form, we receive an email. But we would also like the enquiry to go automatically into our CRM, so it can be followed up in a timely manner by the appropriate person or team in our business.
Goals
- Potential customer completes website enquiry form
- New enquiry gets created in our CRM
- The right people in our business can follow it up
Prerequisites
- An instance of Core
- A website enquiry form that supports webhooks
In this example, we are going to look at a WordPress website using the WP Forms plugin. There are many other form plugins for WordPress and other content management systems available. If you are a developer, you might even have your own custom form solution. As long as your form supports webhooks, you are good to go.
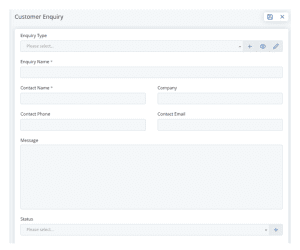
Step 1 – Create a Customer Enquiry Content Type (5 Mins)
First, we need to create the Content Type for our enquiries to go into. In this case we will call it “Customer Enquiries” with the following fields:
- Enquiry Type
- Contact Name
- Company
- Phone
- Enquiry
- Status
Step 2 – Create a User with a Role and Limited Permissions (10 mins)
You can create an access token for any user. But it’s good practice to create a separate user for the API. That way, we can grant a minimum set of permissions to that user. In this case, we only want it to have permissions to create new “Customer Enquiries”.
- Create a User “Website API”
- Create a Role “Website API”
- Grant “Create a Customer Enquiry” permission for the Role
- Assign the Role to the User
For more information on these steps see our documentation for Users and Permissions.
Step 3 – Create an API Access Token for the User (2 mins)
- On the Index screen got to “User Tokens”
- Click the “Add” button
- Choose the User you just created
- Give the Token a name, something like “Website Enquiry API”
Make sure you note down the access token. You will not be able to see it again. If you lose it, you can only delete the token and create a new one.
Step 4 – Configure Your Webhook
For WP Forms, the webhooks feature is only available on the premium version, but the principle is similar with other form plugins, such as Contact Form 7.
Note: WP Forms and Contact Form 7 are both plugins we have used with success. But we are not associated with either of them in any way.
- Go to the WordPress Admin Area
- Click “WP Forms”
- Click “Edit” on your form
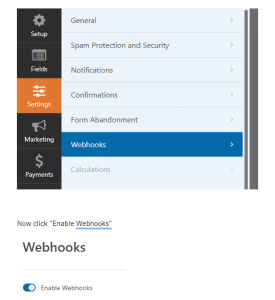
- Then choose the “Settings” option
You should see “Webhooks” as a further option:
Fill out the following settings:
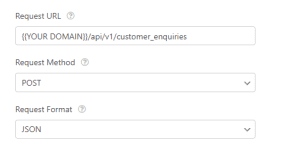
The Secret can be left blank (It will get filled in automatically).
The Request Header Key should be “Authorization” (Note the US spelling with a z).
The Request Header Value should be: “Bearer {{YOUR ACCESS TOKEN}}”.

The Request Body will be the fields from your form:
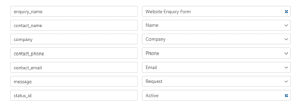
Note: You can choose a value from the form or a Custom Value. In this case we have set the enquiry name field to be “Website Enquiry Form” and the status id to be “Active”. This means that all newly submitted enquiries will have the “Active” status, see below.
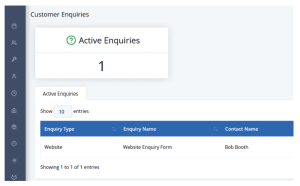
Step 5 – Test Your Form
Fill out your website form and the enquiry should go straight into Core:

Step 6 – Create a Dashboard (5 mins)
This step is optional. But just like we have in other examples, we can easily create a Query to show all “Active” Customer Enquiries and display them on a Dashboard:
Your Customer Service team can use this dashboard to keep on top of all the lovely enquiries that will be flooding in.
Summary
If you would like to find out more about our CORE Software and how this could move your business forwards book a 30-minute Demo with us today.